Man, you are really plugging away at this stuff!!
You are using an out of date browser. It may not display this or other websites correctly.
You should upgrade or use an alternative browser.
You should upgrade or use an alternative browser.
PiMP and 60lbs Upgrade
- Thread starter Required
- Start date
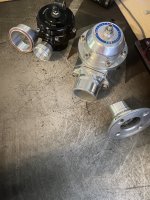
I have the Godzilla on my turbo truck.
Very very nice.
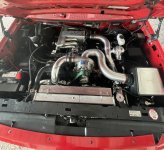
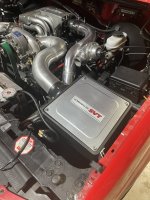
Factory IAT #5 cyl I believe.looks great, where is your IAT sensor location?
I’ve been looking to do a ABS plastic box for a long time, finally settled on that Airaid. The inlet is too small and on the wrong side so some cutting/patching required. Also it’s a 4.325” filter inlet, and a 5” filter. Why they settled on 4.325” is beyond me.Very cool, I really like the airbox setup and yeah these past few weeks are perfect intercooler testing weather
Looking fantastic!!
Very cool
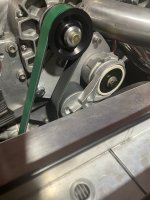
i think the tensioner is supposed to be on the low tension (slack side) of the belt. you have it on the high tension side. i'm not trying to be a wise-guy, but that's the way i was taught in my machine design class in college many moons ago. maybe i've missed something in the last 40 years or so? simply trying to possibly help a little.
You mean flip it to the other side because of belt direction would be better? I chose that side because it was easier didn’t put much thought into anything else.i think the tensioner is supposed to be on the low tension (slack side) of the belt. you have it on the high tension side. i'm not trying to be a wise-guy, but that's the way i was taught in my machine design class in college many moons ago. maybe i've missed something in the last 40 years or so? simply trying to possibly help a little.
in the photo, tensioner needs to be inboard applying force to the green surface (visible in the photo) of the low tension span of belt (belt span on side where 2 allen head bolts are located above/below each other). engine rotation drives the blower and tightens the span of belt you are currently on, making it high tension.
Thanks for the input! I flipped the bracket and put it on the other side, I think I see a difference in the action caused by pulley rotation and belt “flexing” is negated this way. Unfortunately my water pump bolts are super close so now I’m looking for some low profile heads.in the photo, tensioner needs to be inboard applying force to the green surface (visible in the photo) of the low tension span of belt (belt span on side where 2 allen head bolts are located above/below each other). engine rotation drives the blower and tightens the span of belt you are currently on, making it high tension.
Thanks for the input! I flipped the bracket and put it on the other side, I think I see a difference in the action caused by pulley rotation and belt “flexing” is negated this way. Unfortunately my water pump bolts are super close so now I’m looking for some low profile heads.
Any chance you can take a wider angle shot? I'd like to noodle on placement
